HMS Queen Mary
 |
|
| Class overview | |
|---|---|
| Operators: | |
| Preceded by: | Lion-class |
| Succeeded by: | HMS Tiger |
| Built: | 1911—13 |
| In commission: | 1913—16 |
| Completed: | 1 |
| Lost: | 1 |
| Career (United Kingdom) | |
| Name: | HMS Queen Mary |
| Namesake: | Mary of Teck |
| Ordered: | 1910–11 Naval Programme |
| Builder: | Palmers Shipbuilding and Iron Company, Jarrow |
| Laid down: | 6 March 1911 |
| Launched: | 20 March 1912 |
| Completed: | August 1913 |
| Commissioned: | 4 September 1913 |
| Fate: | Sunk at Jutland on 31 May 1916 |
| General characteristics Lion class | |
| Type: | Battlecruiser |
| Displacement: |
26,770 long tons (27,200 t) normal load |
| Length: | 703 feet 6 inches (214.4 m) |
| Beam: | 89 feet 0.5 inches (27.1 m) |
| Draught: | 32 feet 4 inches (9.9 m) at deep load |
| Installed power: | 75,000 shaft horsepower (56,000 kW) |
| Propulsion: | 4 shafts, Parsons direct-drive steam turbines, 42 Yarrow boilers |
| Speed: | 28 knots (52 km/h; 32 mph) |
| Range: | 5,610 nmi (10,390 km; 6,460 mi) at 10 knots (19 km/h; 12 mph) |
| Complement: | 997 (peacetime) 1,275 (wartime) |
| Armament: |
4 × 2 – BL 13.5-inch (343 mm) Mk V guns |
| Armour: | Belt: 9–4 inches (229–102 mm) Bulkheads: 4 inches (102 mm) Barbettes: 9–8 inches (229–203 mm) Turrets: 9 inches (229 mm) Decks: 2.5 inches (64 mm) Conning tower: 10 inches (254 mm) |
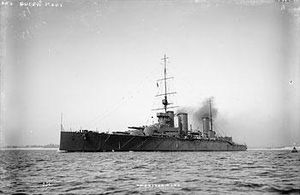
HMS Queen Mary was a battlecruiser built by the British Royal Navy before World War I, the sole member of her class. She was similar to the Lion-class battlecruisers, though she differed in details from her half-sisters. She was the last battlecruiser completed before the beginning of the war and participated in the Battle of Heligoland Bight shortly after the war began. As part of the 1st Battlecruiser Squadron, she attempted to intercept a German force that bombarded the North Sea coast of England in December 1914, but was unsuccessful. She was refitting during the Battle of Dogger Bank in early 1915, but participated in the next major fleet action of the war, the Battle of Jutland in mid-1916. She was hit twice by the German battlecruiser Derfflinger during the 'Run to the South' and exploded shortly afterwards.
Her wreck was discovered in 1991 and rests partly upside-down, on sand, 60 metres (197 ft) down. Queen Mary is designated as a protected place under the Protection of Military Remains Act 1986.
Contents |
Design
General characteristics
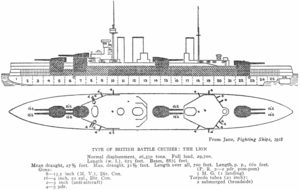
Queen Mary was slightly larger than her predecessors of the Lion class. She had an overall length of 703 feet 6 inches (214 m), including her sternwalk, a beam of 80 feet 0.5 inches (24.397 m), and a draft of 32 feet 4 inches (9.86 m) at deep load. The ship displaced 26,770 long tons (27,200 t) at load and 31,650 long tons (32,158 t) at deep load, over 1,000 long tons (1,016 t) more than the earlier ships. She had a metacentric height of 5.92 feet (1.8 m) at deep load.[1]
Queen Mary was the first battlecruiser to place her officer's quarters in their traditional location, the stern of the ship.[2] In addition she was the first to mount a sternwalk.[3]
Propulsion
Queen Mary had two paired sets of Parsons direct-drive steam turbines housed in separate engine-rooms. Each set consisted of a high-pressure ahead and astern turbine driving an outboard shaft and a low-pressure ahead and astern turbine driving an inner shaft. A cruising stage was built into the casing of each high-pressure ahead turbine.[4] The turbines had a designed output of 75,000 shaft horsepower (55,927 kW). On trials in May and June 1913, Queen Mary achieved more than 83,000 shp (61,893 kW), although she barely exceeded her designed speed of 28 knots (32 mph; 52 km/h).[5]
The steam plant consisted of 42 Yarrow large-tube boilers arranged in seven boiler rooms.[6] Maximum bunkerage was 3,600 long tons (3,700 t) of coal and 1,170 long tons (1,190 t) of fuel oil to be sprayed on the coal to increase its burn rate.[7] Range was 5,610 nautical miles (10,390 km) at a speed of 10 knots (12 mph; 19 km/h).[8]
Armament
Queen Mary mounted eight BL 13.5-inch (343 mm) Mk V guns in four twin hydraulically powered BII turrets, designated 'A', 'B', 'Q' and 'Y' from front to rear. The guns could be depressed to −3° and elevated to 20°, although the rangefinders controlling the turrets were limited to 15° 21' until superelevating prisms were installed before the Battle of Jutland in May 1916 to allow full elevation.[9] They fired 1,400-pound (635 kg) projectiles at a muzzle velocity of 2,582 ft/s (787 m/s); at 14.75°, this provided a maximum range of 20,000 yd (18,288 m) with armour-piercing (AP) shells. At 20° elevation, the range was extended to 23,740 yd (21,708 m). The rate of fire of these guns was 1.5–2 rounds per minute.[10] The ship carried a total of 880 rounds during wartime for 110 shells per gun.[11]
Her secondary armament consisted of sixteen BL 4-inch (102 mm) Mk VII guns, most of which were mounted in casemates.[11] The guns on their PVI mounts could depress to -7° and had a maximum elevation of 15°. They fired 31-pound (14 kg) projectiles at a muzzle velocity of 2,864 ft/s (873 m/s); this gave a maximum range of 11,600 yd (10,600 m). Their rate of fire was 6–8 rounds per minute.[12] They were provided with 150 rounds per gun.[9]
Queen Mary was built without any anti-aircraft guns, but two guns were fitted in October 1914. One was a QF 6 pounder Hotchkiss gun on a high-angle Mk Ic mounting.[11] This had a maximum depression of 8° and a maximum elevation of 60°. It fired a 6-pound (2.7 kg) shell at a muzzle velocity of 1,765 ft/s (538 m/s) at a rate of fire of 20 rounds per minute. It had a maximum ceiling of 10,000 ft (3,000 m), but an effective range of only 1,200 yards (1,100 m).[13] A QF 3 inch 20 cwt gun on a HA Mk II mount was also fitted in October 1914. It had a maximum depression of 10° and a maximum elevation of 90°. It fired a 12.5-pound (5.7 kg) shell at a muzzle velocity of 2,500 ft/s (760 m/s) at a rate of 12–14 rounds per minute. It had a maximum effective ceiling of 23,500 ft (7,163 m).[14]
Two 21-inch (530 mm) submerged torpedo tubes were fitted, one on each side.[8] Fourteen Mk II*** torpedoes were carried[11] which had a warhead of 515 pounds (234 kg) of TNT. Range was 4,500 yards (4,115 m) at 45 knots (83 km/h; 52 mph) or 10,750 yards (9,830 m) at 31 knots (57 km/h; 36 mph).[15]
Fire-control
The main guns of the Queen Mary were controlled from the conning tower. Data from a 9-foot (2.7 m) Argo rangefinder located on top of the conning tower was input into a Argo Clock Mk IV (a mechanical fire-control computer) located in the Transmitting Station (TS) below the conning tower where it was converted into range and deflection data for use by the guns. The target's data was also graphically recorded on a plotting table to assist the gunnery officer in predicting the movement of the target. The aft torpedo director tower was the backup primary gunnery control position. 'B' and 'X' turrets were provided with nine-foot rangefinders and were fitted as secondary control positions.[16]
Fire-control technology advanced quickly during the years immediately preceding World War I and the development of the director firing system was a major advance. This consisted of a fire-control director mounted high in the ship which electrically provided gun data to the turrets via pointers, which the turret crewmen only had to follow. The director officer fired the guns simultaneously which aided in spotting the shell splashes and minimized the effects of the roll on the dispersion of the shells. Queen Mary received her before the Battle of Jutland in 1916.[17]
Armour
The armour protection given to the Queen Mary was similar than that of the Lions; her waterline belt of Krupp Cemented Armour was also 9 inches (229 mm) thick between 'B' and 'X' turrets. It thinned to four inches towards the ships' ends, but did not reach either the bow or the stern. In addition they were given an upper armour belt with a maximum thickness of six inches over the same length as the thickest part of the waterline armour and thinned to 5 inches (127 mm) abreast the end turrets. Four-inch transverse bulkheads closed off the ends of the armoured citadel. High-tensile steel, cheaper than nickel-steel, but equally as effective, plating was used for the protective decks. The lower armoured deck was generally only 1 inch (25.4 mm) thick except outside the citadel where it was 2.5 inches (64 mm). The upper armoured deck was situated at the top of the upper armour belt and was also only one inch thick. The forecastle deck ranged from 1 to 1.5 inches (25.4 to 38.1 mm).[18]
The gun turrets had 9-inch front and sides while their roofs were 2.5 to 3.25 inches (64 to 83 mm) thick. The barbettes were protected by 9 inches of armour above the deck, but it thinned to 8 inches (203 mm) above the upper armour deck and 3 inches (76 mm) below it. The forward 4-inch guns were protected by three-inch sides and a two-inch high-tensile steel deck overhead. The conning tower sides were 10 inches (254 mm) thick and it had a three-inch roof and communication tube. Her after torpedo director tower was protected by six-inch walls and a three-inch cast steel roof. High-tensile steel torpedo bulkheads 2.5 inches (64 mm) thick were fitted abreast the magazines and shell rooms. Her funnel uptakes were protected by high-tensile steel splinter armour 1.5 inches (38 mm) thick on the sides and one inch on the ends between the upper and forecastle decks.[19]
Service
Pre-war career
Queen Mary was laid down at Palmers Shipbuilding and Iron Company, Jarrow on 6 March 1911. She was launched on 20 March 1912 and was completed on 4 September 1913,[20] at a total cost of £2,078,491.[21] Upon commissioning, she joined the 1st Battlecruiser Squadron (BCS), under command of Rear Admiral Beatty. Queen Mary, along with the rest of the 1st BCS, made a port visit to Brest in February 1914 and the squadron visited Russia in June.[22]
World War I
Battle of Heligoland Bight
Queen Mary's first action was as part of the battlecruiser force under the command of Admiral Beatty during the Battle of Heligoland Bight on 28 August 1914. Beatty's ships had originally been intended as distant support of the British cruisers and destroyers closer to the German coast in case the large ships of the High Seas Fleet sortied in response to the British attacks. They turned south at full speed at 11:35 AM[Note 1] when the British light forces failed to disengage on schedule and the rising tide meant that German capital ships would be able to clear the bar at the mouth of the Jade Estuary. The brand-new light cruiser Arethusa had been crippled earlier in the battle and was under fire from the German light cruisers Strassburg and Köln when Beatty's battlecruisers loomed out of the mist at 12:37 PM. Strassburg was able to duck into the mists and evade fire, but Köln remained visible and was quickly crippled by fire from the squadron. Beatty, however, was distracted from the task of finishing her off by the sudden appearance of the elderly light cruiser Ariadne directly to his front. He turned in pursuit and reduced her to a flaming hulk in only three salvos at close range (under 6,000 yards (5.5 km)). At 1:10 PM Beatty turned north and made a general signal to retire. Beatty's main body encountered the crippled Köln shortly after turning north and she was sunk by two salvos from Lion.[23]
Raid on Scarborough
The German Navy had decided on a strategy of bombarding British towns on the North Sea coast in an attempt to draw out the Royal Navy and destroy elements of it in detail. An earlier Raid on Yarmouth on 3 November had been partially successful, but a larger-scale operation was devised by Admiral Franz von Hipper afterwards. The fast battlecruisers would actually conduct the bombardment while the entire High Seas Fleet was to station itself east of Dogger Bank to provide cover for their return and to destroy any elements of the Royal Navy that responded to the raid. But what the Germans did not know was that the British were reading the German naval codes and were planning to catch the raiding force on its return journey, although they were not aware that the High Seas Fleet would be at sea as well. Admiral Beatty's 1st BCS, now reduced to four ships, including Lion, as well as the 2nd Battle Squadron with six dreadnoughts, was detached from the Grand Fleet in an attempt to intercept the Germans near Dogger Bank.[24]
Admiral Hipper set sail on 15 December 1914 for another such raid and successfully bombarded several English towns, but British destroyers escorting the 1st BCS had already encountered German destroyers of the High Seas Fleet at 5:15 AM and fought an inconclusive action with them. Vice Admiral Sir George Warrender, commanding the 2nd Battle Squadron, had received a signal at 5:40 that the destroyer Lynx was engaging enemy destroyers although Beatty had not. The destroyer Shark spotted the German armoured cruiser Roon and her escorts at about 7:00, but could not transmit the message until 7:25. Admiral Warrender received the signal, as did the battlecruiser New Zealand, but Beatty did not, despite the fact that New Zealand had been specifically tasked to relay messages between the destroyers and Beatty. Warrender attempted to pass on Shark's message to Beatty at 7:36, but did not manage to make contact until 7:55. Beatty reversed course when he got the message and dispatched New Zealand to search for Roon. She was being overhauled by New Zealand when Beatty received messages that Scarborough was being shelled at 9:00. Beatty ordered New Zealand to rejoin the squadron and turned west for Scarborough.[25]
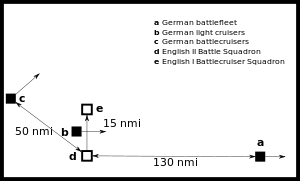
The British forces split going around the shallow Southwest Patch of the Dogger Bank; Beatty's ships passed to the north while Warrender passed to the south as they headed west to block the main route through the minefields defending the English coast. This left a 15 nautical miles (28 km) gap between them through which the German light forces began to move. At 12:25, the light cruisers of the II Scouting Group began to pass the British forces searching for Hipper. The light cruiser Southampton spotted the light cruiser Stralsund and signalled a report to Beatty. At 12:30 Beatty turned his battlecruisers towards the German ships. Beatty presumed that the German cruisers were the advance screen for Hipper's ships, however, those were some 50 km (31 mi) behind. The 2nd Light Cruiser Squadron, which had been screening for Beatty's ships, detached to pursue the German cruisers, but a misinterpreted signal from the British battlecruisers sent them back to their screening positions.[Note 2] This confusion allowed the German light cruisers to escape, and alerted Hipper to the location of the British battlecruisers. The German battlecruisers wheeled to the northeast of the British forces and made good their escape.[26]
She was refitting January-February 1915 and did not participate in the Battle of Dogger Bank.[27]
Battle of Jutland
On 31 May 1916 Queen Mary put to sea with the rest of the Battlecruiser Fleet to intercept a sortie by the High Seas Fleet into the North Sea. The British were able to decode the German radio messages and left their bases before the Germans put to sea. Hipper's battlecruisers spotted the Battlecruiser Fleet to their west at 3:20 PM, but Beatty's ships did not spot the Germans to their east until 3:30. Almost immediately afterward, at 3:32, he ordered a course change to east south-east to position himself astride the German's line of retreat and called his ships' crews to action stations. Hipper ordered his ships to turn to starboard, away from the British, to assume a south-easterly course, and reduced speed to 18 knots (33 km/h; 21 mph) to allow three light cruisers of the 2nd Scouting Group to catch up. With this turn Hipper was falling back on the High Seas Fleet, then about 60 miles (97 km) behind him. Around this time Beatty altered course to the east as it was quickly apparent that he was still too far north to cut off Hipper.[28]
This began what was to be called the 'Run to the South' as Beatty changed course to steer east south-east at 3:45, paralleling Hipper's course, now that the range closed to under 18,000 yards (16,000 m). The Germans opened fire first at 3:48, followed almost immediately afterwards by the British. The British ships were still in the process of making their turn as only the two leading ships, Lion and Princess Royal had steadied on their course when the Germans opened fire. The German fire was accurate from the beginning, but the British over-estimated the range as the German ships blended into the haze. Queen Mary opened fire about 3:50 on Seydlitz, using only her forward turrets.[29] By 3:54 the range was down to 12,900 yards (11,800 m) and Beatty ordered a course change two points to starboard to open up the range at 3:57.[30] During this period Queen Mary made two hits on Seydlitz, at 3:55 and 3:57, one of which caused a massive cordite fire that burnt-out her aft superfiring turret[31]
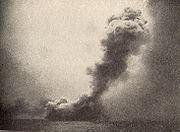
The range had grown too far for accurate shooting so Beatty altered course four points to port to close the range again between 4:12 and 4:15. This maneuver exposed Lion to the fire of the German battlecruisers and she was hit several times. The smoke and fumes from these hits caused Derfflinger to lose sight of Princess Royal and she switched her fire to Queen Mary at 4:16. Queen Mary hit Seydlitz again at 4:17 that knocked out one gun of her secondary armament.[32] At 4:21 Seydlitz hit the turret face of 'Q' turret and knocked out the right-hand gun in the turret; she had been hit twice earlier by Seydlitz, but with unknown effects. By 4:25 the range was down to 14,400 yards (13,200 m) and Beatty turned two points to starboard to open the range again. However it was too late for Queen Mary as Derfflinger's fire began to take effect and she hit Queen Mary twice before 4:26.[33] One shell hit forward and detonated one or both of the forward magazines which broke the ship in two near the foremast. The second hit may have struck 'Q' turret and started a fire in 'Q' working chamber. A further explosion, possibly from shells breaking loose, shook the aft end of the ship as it began to roll over and sink.[34]
The battlecruiser behind her, Tiger, was showered with debris from the explosion and forced to steer to port to avoid her remains.[35] 1,266 crew were lost, with eighteen survivors being picked up by the destroyers Laurel and Petard, two by the Germans,[36] and one rescued by the Tipperary.[37] Her aft end is upside down and intact, although her propellers have been salvaged.[34] Queen Mary, along with the other Jutland wrecks, has belatedly been declared a protected place under the Protection of Military Remains Act 1986 to discourage further damage to the resting place of 1,257 officers and men.[38]
Notes
- ↑ The times used in this article are in UTC, which is one hour behind CET, which is often used in German works.
- ↑ Beatty had intended on retaining only the two rearmost light cruisers from Goodenough's squadron; however, Nottingham's signalman misinterpreted the signal, thinking that it was intended for the whole squadron, and thus transmitted it to Goodenough, who ordered his ships back into their screening positions ahead of Beatty's battlecruisers.
Footnotes
- ↑ Roberts, pp. 43, 45
- ↑ Burt, p. 45
- ↑ Parkes, pp. 531-536
- ↑ Burt, p. 158
- ↑ Roberts, pp. 76, 80
- ↑ Roberts, pp. 70–76
- ↑ Roberts, p. 76
- ↑ 8.0 8.1 Gardiner and Gray, p. 31
- ↑ 9.0 9.1 Campbell, p. 33
- ↑ "British 13.5"/45 (34.3 cm) Mark V(L) 13.5"/45 (34.3 cm) Mark V(H)". 1 May 2009. http://www.navweaps.com/Weapons/WNBR_135-45_mk5.htm. Retrieved 4 March 2010.
- ↑ 11.0 11.1 11.2 11.3 Roberts, p. 83
- ↑ "Britain 6-pdr / 8cwt (2.244"/40 (57 mm)) QF Marks I and II". Navweaps.com. 16 May 2008. http://www.navweaps.com/Weapons/WNBR_6pounder_m1.htm. Retrieved 11 November 2009.
- ↑ "British 12-pdr (3"/45 (76.2 cm)) 20cwt QF HA Marks I, II, III and IV". Navweaps.com. 27 February 2007. http://www.navweaps.com/Weapons/WNBR_3-45_mk1.htm. Retrieved 11 November 2009.
- ↑ "British Torpedoes Pre-World War II: 21" (53.3 cm) Mark II***". 12 January 2009. http://www.navweaps.com/Weapons/WTBR_PreWWII.htm. Retrieved 7 March 2010.
- ↑ Roberts, pp. 91–92
- ↑ Roberts, pp. 92–93
- ↑ Roberts, pp. 102–03
- ↑ Roberts, pp. 109, 112
- ↑ Roberts, p. 41
- ↑ Burt, p. 167
- ↑ Burt, p. 161
- ↑ Massie, pp. 109–13
- ↑ Massie, pp. 333–34
- ↑ Massie, pp. 342–43
- ↑ Tarrant, p. 34
- ↑ Roberts, p. 123
- ↑ Tarrant, pp. 69, 71, 75
- ↑ Brooks, p. 237
- ↑ Tarrant, p. 83
- ↑ Brooks, p. 241
- ↑ Tarrant, p. 89
- ↑ Brooks, p. 246
- ↑ 34.0 34.1 Brown, p. 167
- ↑ Brooks, p. 247
- ↑ Williams, p. 132.
- ↑ "Twice Rescued from the Sea" (News). The Times. Tuesday, 6 June 1916. Issue 41186, col A, p. 10.
- ↑ "Statutory Instrument 2006 No. 2616 The Protection of Military Remains Act 1986 (Designation of Vessels and Controlled Sites) Order 2006". Queen's Printer of Acts of Parliament. http://www.opsi.gov.uk/si/si2006/20062616.htm. Retrieved 20 November 2009.
Bibliography
- Brooks, John (2005). Dreadnought Gunnery and the Battle of Jutland: The Question of Fire Control. Cass Series: Naval Policy and History. 32. New York: Routledge. ISBN 0-415-40788-5.
- Brown, David K. (2003). The Grand Fleet: Warship Design and Development 1906–1922 (reprint of the 1999 ed.). London: Caxton Editions. ISBN 1-84067-531-4.
- Burt, R. A. (1986). British Battleships of World War One. Annapolis, MD: Naval Institute Press. ISBN 0-87021-863-8.
- Campbell, N. J. M. (1978). Battle Cruisers. Warship Special. 1. Greenwich: Conway Maritime Press. ISBN 0-85177-130-0.
- Gardiner, Robert; Gray, Randal, eds (1984). Conway's All the World's Fighting Ships: 1906–1922. Annapolis, MD: Naval Institute Press. ISBN 0-85177-245-5.
- Massie, Robert (2004). Castles of Steel: Britain, Germany and the Winning of the Great War. New York: Random House. ISBN 0224040928.
- Parkes, Oscar (1990). British Battleships (reprint of the 1957 edition ed.). Annapolis, MD: Naval Institute Press. ISBN 1-55750-075-4.
- Roberts, John (1997). Battlecruisers. Annapolis, MD: Naval Institute Press. ISBN 1-55750-068-1.
- Tarrant, V. E. (1999). Jutland: The German Perspective: A New View of the Great Battle, 31 May 1916 (reprint of the 1995 ed.). London: Brockhampton Press. ISBN 1-86019-917-8.
- Williams, M. W. (1996). "The Loss of HMS Queen Mary at Jutland". Warship 1996 (Conway Maritime Press): pp. 111–132. ISBN 085177685X.
External links
 Media related to HMS Queen Mary at Wikimedia Commons
- Maritimequest HMS Queen Mary Photo Gallery. Includes a striking photo of her explosion at Jutland.
- High precision 3D model at Dreadnought Project Model page
- Information page at worldwar1.co.uk
|
||||||||